A number of you who actually read the blog (vs. scan the pictures…you know who you are!) have requested that I put together a post about climbing terms. I deem this an excellent idea, thus this post! I’m glad all you non-climbers have enjoyed my recent Smith Rock post so much, and now you can re-read it armed with an understanding for what the heck I’m talking about. Also, for those of you non-reader’s, I’ve included pics too.
I should note, I used this Climbing Dictionary site to help me explain some terms. It’s very comprehensive should something not make sense – but I didn’t straight copy ’cause I ain’t no thief!
First, lets start with the basics. Rock Climbing is the act of ascending a rock face using your hands and feet (and in my case knees and elbows) while protected from a fall by a rope. You wear a climbing harness, which you use to tie into the rope. This means if you fall, the rope will catch you. Also, since I’ve got this handy picture, you can see the orange locking carabiner and the belay device hanging below. We’ll come back to those later. Just note them for now.
There are two different kinds of climbing: Traditional (called Trad) and Sport. I’m a sport climber for the most part, so I’ll explain that first. On sport climbs, there are bolts already drilled into the rock.
As you climb, you use quick draws to clip into the wall, then you attach your rope to the other end of the quick draw.
This attaches you to the wall, and protects you from a fall.
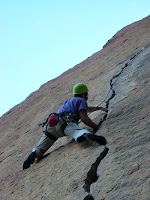
Trad Climbing is your more hard core option, as you do not have bolts drilled into the rock. Instead, you place pieces of protection (also called pro) into the rock as you climb. The most common Pro are nuts and cams.
Trad climbing requires a crack in the rock in which to place gear. Once the Pro is placed, you attach a quick draw to the pro and then to the rope. So one again, this will protect you from a fall.
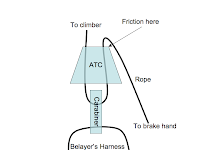
However, in order to be truly protected, you need to have a partner on the other end of the rope. This is your Belayer. Giving a Belay is the process of paying out or taking in the rope for a climber as they climb, thus protecting the climber in the event of a fall. The belayer runs the rope through a Belay Device (shown above as part of the harness, and see below), which attaches to the climber’s harness with the rope is threaded through it, and the purpose is to create friction quickly in the event of a fall so the belayer can stop the rope by pulling against the device. The device creates a ‘hairpin’ turn in the rope and allows the belayer to stop or brake the rope instantly.
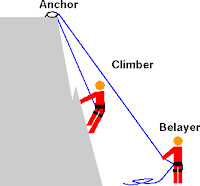
The first person to climb a pitch, i.e. a rope-length or a “climb”, is called a Lead Climber. This person clips into the wall with quickdraws as they climb, thus they are often above their rope. If you take a leader fall, you are falling further than you would if you fall on Top Rope.
Top Roping a climb is where you climb with the rope already attached to the top, therefore if you fall at most you are falling a few feet of rope give, or the stretch in the rope. If you take a leader fall you are falling to your nearest protection, plus the length of the rope. For example, you are leading, and you are 5-feet above your last bolt when you fall. That means you are falling 5-feet down to the bolt, plus another 5-feet for the length of the rope, plus rope give. Taking a leader fall is also called taking a Whipper for this reason, as you can get whipped around a bit. Basically I’m trying to say that leader falls are not awesome.
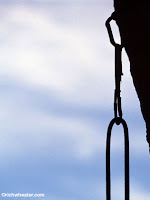
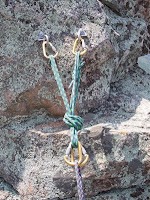
Assuming the leader makes it safely to the top of the pitch, they will then set up the top rope at the anchor station. In sport climbing, an anchor is a set of two bolts pre-drilled into the rock. With trad climbing, the climber has to build the anchor. Below you see an example of a sport anchor. Here the climber uses a system of carabiners, slings (a loop of webbing or rope), or quickdraws to attach the rope to the wall. Once the rope has been secured, the belayer will lower the lead climber to the ground, and the next climber can proceed.
Other options for getting off of a route is downclimbing, literally climbing down the wall while being protected by your belayer, or rappelling, which is the act of self-belaying. Rappelling is my absolute favourite! It makes me VERY happy! I like to wear my ‘Michael Jackson’ glove and go REALLY fast! The beauty of a rappel is you control the lower speed yourself. So you can go as fast or as slow as you want!
However, you generally only rappel once everyone is done with the climb, as it takes longer than just being lowered by your belayer. The last person to send (complete a route successfully) a climb is generally to person to rappel off of and clean the route. When you clean, you remove the quickdraws/slings/carabiners you’ve used to set up the top rope, and instead run the rope directly through the bolts. Then you lower yourself to safety and pull the rope down.
Okay, those are the basics! Now you’re saying, “But Kristina, you have all of these pictures, but how do we know if you’re any good at climbing?“. Excellent question my friend! There are rating systems to tell you!
Rock climbing is rated based on the Yosemite Decimal System (YDS). This rates climbs from 5.0-5.14c/d, with higher numbers representing harder climbs. Generally a 5.0 is something you could walk up unroped, but if you were dealing with a lot of exposure (being very far above your last piece of protection or being in a situation in which you are very aware that you are high off the ground or in a remote location) you will want to rope up. Most sport climbs start at a 5.4 for the easiest and go up from there. The ratings proceed as 5.5, 5.6, 5.7, 5.8, & 5.9, then begin to add letters, 5.10a, .10b, .10c, .10d, 11a, and so forth. Generally climbers will refer to a climb by just the decimal number. For example, a 5.9 will be called a “nine”. This is just becuase we are lazy.
There is also a star rating system which has to do with the quality of a climb. A 4-star is better than a 1-star. I like to try and find 4-stars and just climb those!
Well, that basically wraps this up! I’ll leave you with a few other definitions I’ve used in previous posts or I think are relevant, but I’ll leave out my ramblings.
Traverse: crossing the rock in a sideways pattern, not going straight up.
Beta: information a fellow climber will give you about the route; i.e. put your hand here, your foot here, etc.
Arete: a narrow ridge, or corner, of rock. Actually derived from the french word for “stop”.
Multi-pitch: a climbing route that has multiple pitches.
Scramble: having to use hands and feet to get to a climb, generally a really steep hike or climbing over big rock boulders.
Approach: the climb/scramble to get to the bottom of a route.
Overhung: when a route is more than 90-degrees vertical.







Very good tutorial!
This comment has been removed by a blog administrator.
Nice post
Climbing a rope is a great workout, not only for the upper body but also for the feet. I love rope climbing because it keeps me fit, it's fun and when you look at it from hindsight, it is really for survival. There are a lot of ropes available today and for me, that's quite a selection. Unlike before where the options are really limited. Polyester rope is great but so are double braided nylon ropes. I make sure that when I climb rope, I have the right gear, as you can see in this site: http://backpackingmastery.com/skills/how-to-climb-a-rope.html